Conditional Formatting
Introduction
In addition to standard cell formatting options, most spreadsheet software provides an option known as Conditional Formatting, which allows formatting options to be set based on the value of a cell.
The cell's standard formatting defines most style elements that will always be applied, such as the font face and size; but Conditional Formatting allows you to override some elements of that cell style such as number format mask; font colour, bold, italic and underlining; borders; and fill colour and pattern.
Conditional Formatting can be applied to individual cells, or to a range of cells.
Example
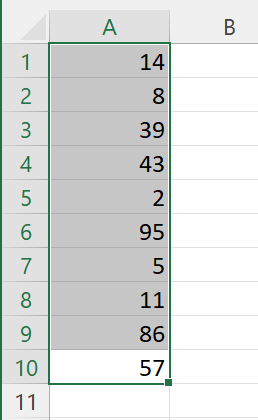
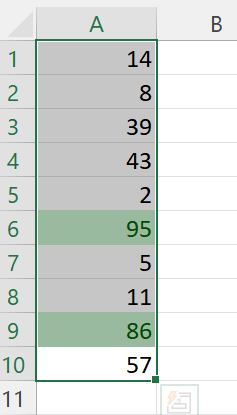
As a simple example in MS Excel itself, if we wanted to highlight all cells in the range A1:A10 that contain values greater than 80, start by selecting the range of cells.
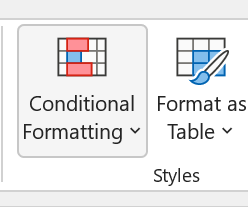
On the Home tab, in the "Styles" group, click "Conditional Formatting". This allows us to select an Excel Wizard to guide us through the process of creating a Conditional Rule and defining a Style for that rule.
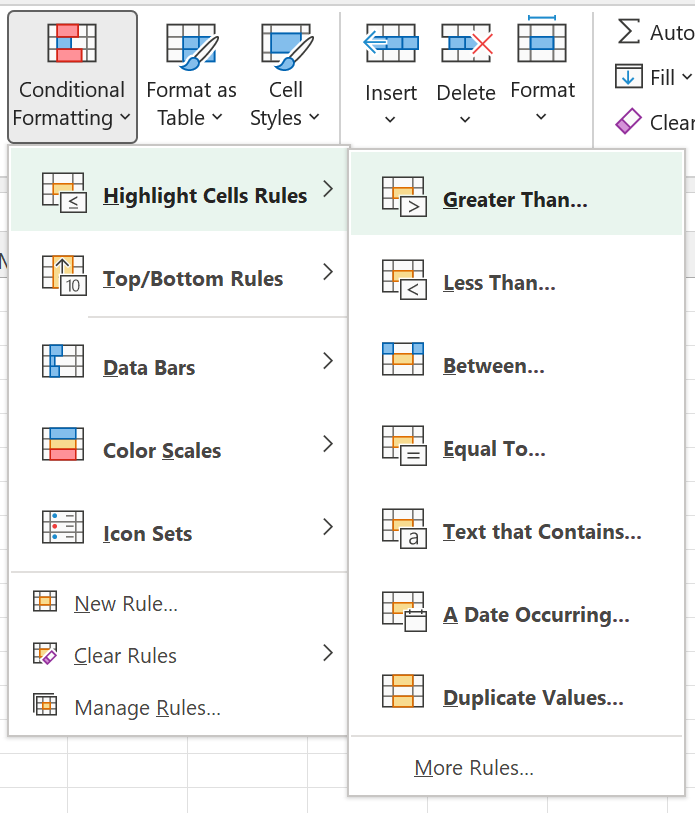
Click "Highlight Cells Rules", then "Greater Than".
Enter the value "80" in the prompt box; and either select one of the pre-defined formatting style (or create a custom style from there).
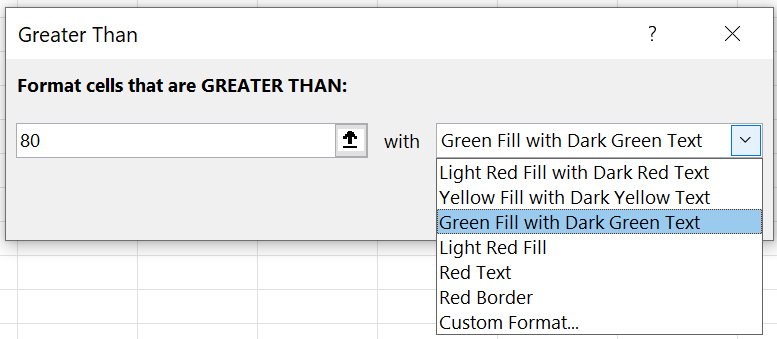
Then click "OK". The rule is immediately applied to the selected range of cells, highlighting all those with a value greater than 80 in the chosen style.
Any change to the value of a cell within that range will immediately check the rule, and automatically apply the new styling if it applies.
If we wanted to set up the same Conditional Formatting rule in PHPSpreadsheet, we would do so using the following code:
$conditional = new \PhpOffice\PhpSpreadsheet\Style\Conditional();
$conditional->setConditionType(\PhpOffice\PhpSpreadsheet\Style\Conditional::CONDITION_CELLIS);
$conditional->setOperatorType(\PhpOffice\PhpSpreadsheet\Style\Conditional::OPERATOR_GREATERTHAN);
$conditional->addCondition(80);
$conditional->getStyle()->getFont()->getColor()->setARGB(\PhpOffice\PhpSpreadsheet\Style\Color::COLOR_DARKGREEN);
$conditional->getStyle()->getFill()->setFillType(\PhpOffice\PhpSpreadsheet\Style\Fill::FILL_SOLID);
$conditional->getStyle()->getFill()->getStartColor()->setARGB(\PhpOffice\PhpSpreadsheet\Style\Color::COLOR_GREEN);

$conditionalStyles = $spreadsheet->getActiveSheet()->getStyle('A1:A10')->getConditionalStyles();
$conditionalStyles[] = $conditional;

$spreadsheet->getActiveSheet()->getStyle('A1:A10')->setConditionalStyles($conditionalStyles);
Depending on the Rules that we might want to apply for a Condition, sometimes an "operator Type" is required, sometimes not (and not all Operator Types are appropriate for all Condition Types); sometimes a "Condition" is required (or even several conditions), sometimes not, and sometimes it must be a specific Excel formula expression. Creating conditions manually requires a good knowledge of when these different properties need to be set, and with what type of values. This isn't something that an end-user developer should be expected to know.
So - to eliminate this need for complex and arcane knowledge - since PHPSpreadsheet verson 1.22.0 there is also a series of Wizards that can assist with creating Conditional Formatting rules, and which are capable of setting the appropriate operators and conditions (including the sometimes complex Excel formula expressions) for a Conditional Rule:
$wizardFactory = new \PhpOffice\PhpSpreadsheet\Style\ConditionalFormatting\Wizard('A1:A10');
$wizard = $wizardFactory->newRule(\PhpOffice\PhpSpreadsheet\Style\ConditionalFormatting\Wizard::CELL_VALUE);
$wizard->greaterThan(80);
$wizard->getStyle()->getFont()->getColor()->setARGB(\PhpOffice\PhpSpreadsheet\Style\Color::COLOR_DARKGREEN);
$wizard->getStyle()->getFill()->setFillType(\PhpOffice\PhpSpreadsheet\Style\Fill::FILL_SOLID);
$wizard->getStyle()->getFill()->getStartColor()->setARGB(\PhpOffice\PhpSpreadsheet\Style\Color::COLOR_GREEN);

$conditional = $wizard->getConditional();
The Wizards know which operator types match up with condition types, and provide more meaningful method names for operators, and they build expressions and formulae when required; and also work well with an IDE such as PHPStorm.
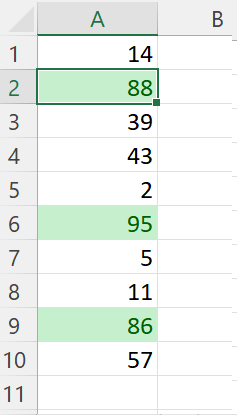
Note that $conditionalStyles is an array: it is possible to apply several conditions to the same range of cells. If we also wanted to highlight values that were less than 10 in the A1:A10 range, we can add a second style rule.
In Excel, we would do this by selecting the range again, and going through the same process, this time selecting the "Highlight Cells Rules", then "Less Than" from the "Conditional Styles" menu, entering the value "10" in the prompt box, and selecting the appropriate style.
In PHPSpreadsheet, we would do:
$conditional2 = new \PhpOffice\PhpSpreadsheet\Style\Conditional();
$conditional2->setConditionType(\PhpOffice\PhpSpreadsheet\Style\Conditional::CONDITION_CELLIS);
$conditional2->setOperatorType(\PhpOffice\PhpSpreadsheet\Style\Conditional::OPERATOR_LESSTHAN);
$conditional2->addCondition(10);
$conditional2->getStyle()->getFont()->getColor()->setARGB(\PhpOffice\PhpSpreadsheet\Style\Color::COLOR_DARKRED);
$conditional2->getStyle()->getFill()->setFillType(\PhpOffice\PhpSpreadsheet\Style\Fill::FILL_SOLID);
$conditional2->getStyle()->getFill()->getStartColor()->setARGB(\PhpOffice\PhpSpreadsheet\Style\Color::COLOR_RED);

$conditionalStyles = $spreadsheet->getActiveSheet()->getStyle('A1:A10')->getConditionalStyles();
$conditionalStyles[] = $conditional2;

$spreadsheet->getActiveSheet()->getStyle('A1:A10')->setConditionalStyles($conditionalStyles);
or again, using the Wizard:
$wizardFactory = new \PhpOffice\PhpSpreadsheet\Style\ConditionalFormatting\Wizard('A1:A10');
$wizard = $wizardFactory->newRule(\PhpOffice\PhpSpreadsheet\Style\ConditionalFormatting\Wizard::CELL_VALUE);
$wizard->lessThan(10);
$wizard->getStyle()->getFont()->getColor()->setARGB(\PhpOffice\PhpSpreadsheet\Style\Color::COLOR_DARKGREEN);
$wizard->getStyle()->getFill()->setFillType(\PhpOffice\PhpSpreadsheet\Style\Fill::FILL_SOLID);
$wizard->getStyle()->getFill()->getStartColor()->setARGB(\PhpOffice\PhpSpreadsheet\Style\Color::COLOR_GREEN);

$conditional = $wizard->getConditional();
Order of Evaluating Multiple Rules/Conditions
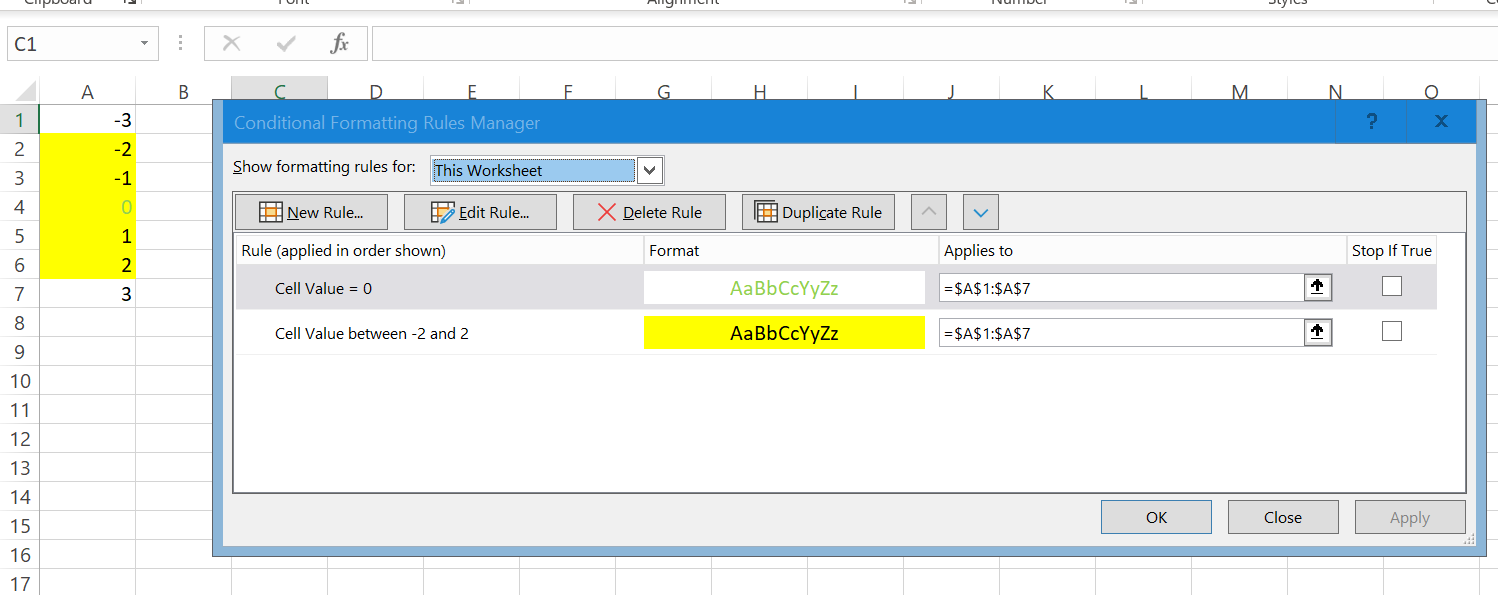
$conditionalStyles is an array, which not only represents multiple conditions that can be applied to a cell (or range of cells), but also the order in which they are checked. Some spreadsheet programs stop processing conditions once they find a match. On the other hand, MS Excel will check each of those conditions in turn in the order they are defined. It will stop checking only if it finds a matching rule that specifies 'stop if true'; however, if it finds conflicting matches with conflicting formatting (e.g. both set a background fill color but use different choices), the first match wins. In either case, this means that the order of checking conditions can be important.
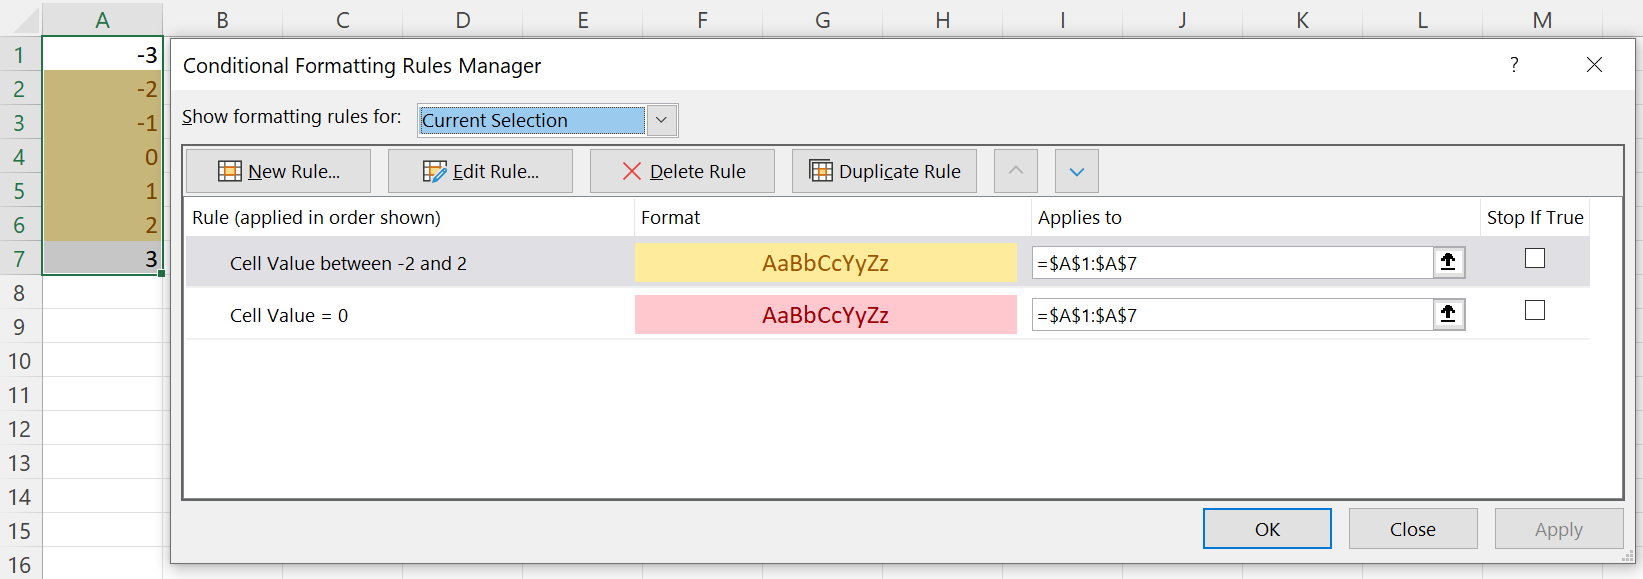
Consider the following. We have one condition that checks if a cell value is between -2 and 2, styling the fill color of the cell in yellow if that condition matches; and a second condition that checks if the cell value is equal to 0, styling the fill color of the cell in red if that matches. - Yellow if value is between -2 and 2 - Red if value equals 0
If they are evaluated in the order I've described above, and the cell has a value of 0, then the first rule will match (because 0 is between -2 and 2), and the cell will be styled in yellow, and no further conditions will be checked. So the rule that styles the cell in red if the value is 0 will never be assessed, even though that would also match (and is probably what we actually wanted, otherwise why have an explicit rule defined for that condition).
If the rule order is reversed - Red if value equals 0 - Yellow if value is between -2 and 2
then the cell containing the value 0 will be rendered in red, because that is the first matching condition; and the formatting in the other condition conflicts with this, so is discarded.
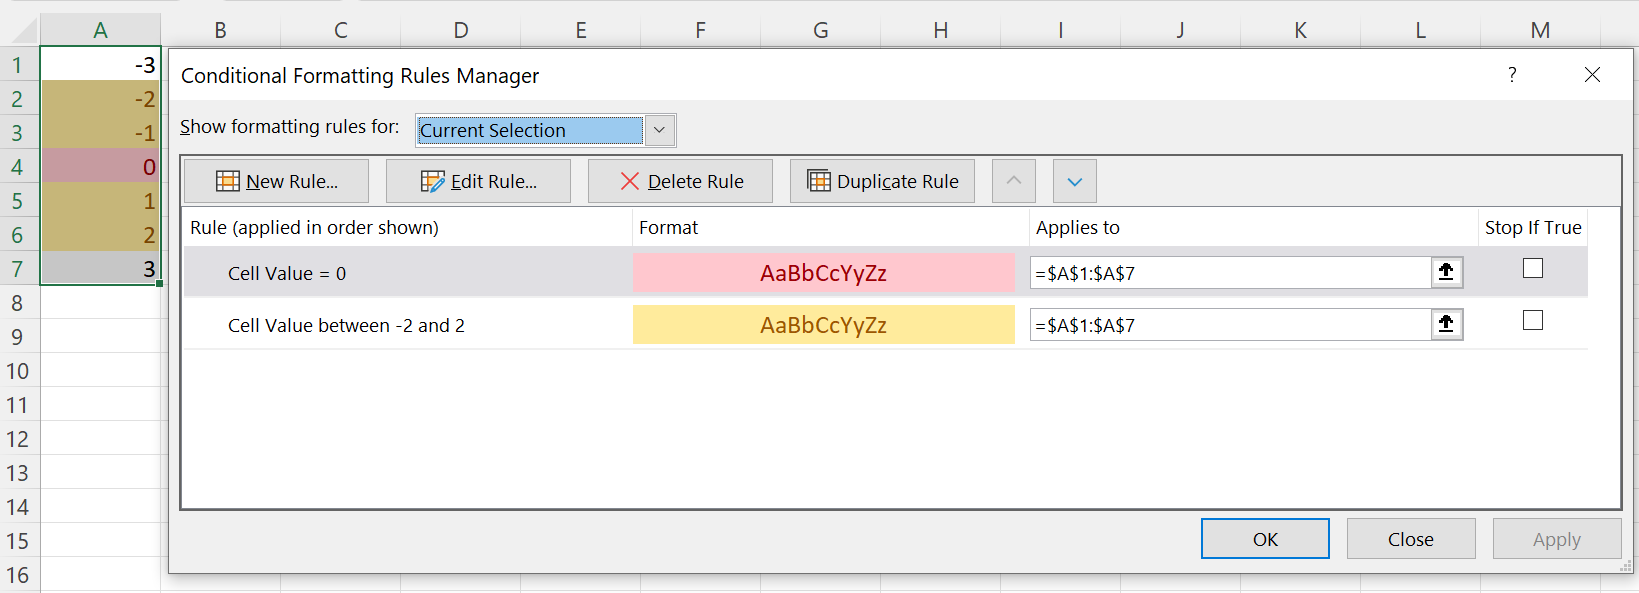
So when you have multiple conditions where the rules might "overlap", the order of these is important.
If the cell matches multiple conditions, Excel (but not most other spreadsheet programs) will apply non-conflicting styles from each match. So, for the example above, if we wanted a match of 0 to have a different font color rather than a different fill color, Excel can honor both.
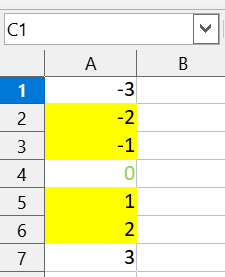
Here is the same spreadsheet opened in LibreOffice - cell A4 has only the first conditional style applied to it. (You would see the same if you checked 'Stop if True' in Excel.) If you want the spreadsheet to appear the same in both Excel and LibreOffice, you would need to use more complicated conditions.
PhpSpreadsheet supports the setting of Stop If True.
Reader/Writer Support
Currently, the following Conditional Types are supported for the following Readers and Writers:
| MS Excel | Conditional Type | Readers | Writers |
|---|---|---|---|
| Cell Value | Conditional::CONDITION_CELLIS | Xlsx | |
| Specific Text | Conditional::CONDITION_CONTAINSTEXT | Xlsx | Xlsx, Html |
| Conditional::CONDITION_NOTCONTAINSTEXT | Xlsx | Xlsx, Html | |
| Conditional::CONDITION_BEGINSWITH | Xlsx | Xlsx, Html | |
| Conditional::CONDITION_ENDSWITH | Xlsx | Xlsx, Html | |
| Dates Occurring | Conditional::CONDITION_TIMEPERIOD | Xlsx | Xlsx, Html |
| Blanks | Conditional::CONDITION_CONTAINSBLANKS | Xlsx | Xlsx, Html |
| No Blanks | Conditional::CONDITION_NOTCONTAINSBLANKS | Xlsx | Xlsx, Html |
| Errors | Conditional::CONDITION_CONTAINSERRORS | Xlsx | Xlsx, Html |
| No Errors | Conditional::CONDITION_NOTCONTAINSERRORS | Xlsx | Xlsx, Html |
| Duplicates/Unique | Conditional::CONDITION_DUPLICATES | Xlsx | Xlsx, Html |
| Conditional::CONDITION_UNIQUE | Xlsx | Xlsx, Html | |
| Use a formula | Conditional::CONDITION_EXPRESSION | Xlsx | Xlsx, Xls, Html |
| Data Bars | Conditional::CONDITION_DATABAR | Xlsx | Xlsx, Html |
| Colour Scales | Conditional::COLORSCALE | Xlsx | Html |
To enable conditional formatting for Html writer, use:
        $writer = new HtmlWriter($spreadsheet);
        $writer->setConditionalFormatting(true);
The following Conditional Types are currently not supported by any Readers or Writers:
| MS Excel | Conditional Type |
|---|---|
| Above/Below Average | ? |
| Top/Bottom Items | ? |
| Top/Bottom %age | ? |
| Icon Sets | ? |
Unsupported types will by ignored by the Readers, and cannot be created through PHPSpreadsheet.
Wizards
While the Wizards don't simplify defining the Conditional Style itself; they do make it easier to define the conditions (the rules) where that style will be applied. MS Excel itself has wizards to guide the creation of Conditional Formatting rules and styles.
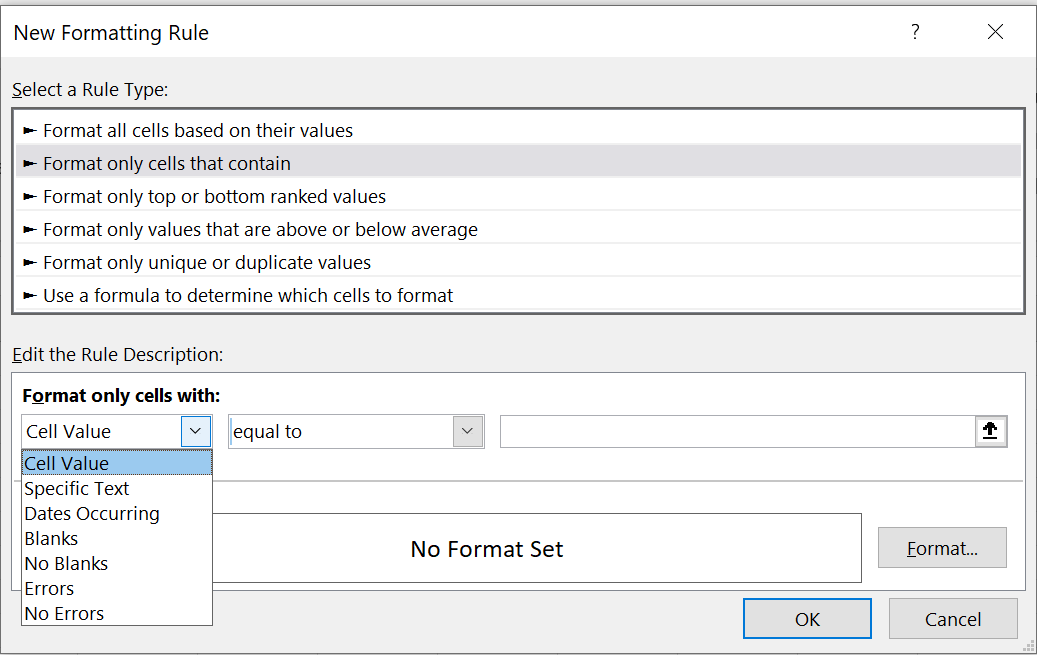
The Wizard Factory allows us to retrieve the appropriate Wizard for the CF Rule that we want to apply. Most of those that have already been defined fall under the "Format only cells that contain" category. MS Excel provides a whole series of different types of rule, each of which has it's own formatting and logic. The Wizards try to replicate this logic and behaviour, similar to Excel's own "Formatting Rule" helper wizard.
| MS Excel | Wizard Factory newRule() Type Constant | Wizard Class Name |
|---|---|---|
| Cell Value | Wizard::CELL_VALUE | CellValue |
| Specific Text | Wizard::TEXT_VALUE | TextValue |
| Dates Occurring | Wizard::DATES_OCCURRING | DateValue |
| Blanks | Wizard::BLANKS | Blanks |
| No Blanks | Wizard::NOT_BLANKS | Blanks |
| Errors | Wizard::ERRORS | Errors |
| No Errors | Wizard::NOT_ERRORS | Errors |
Additionally, Wizards also exists for "Format only unique or duplicate values", and for "Use a formula to determine which cells to format":
| MS Excel | Wizard Factory newRule() Type Constant | Wizard Class Name |
|---|---|---|
| Duplicates/Unique | Wizard::DUPLICATES or Wizard::UNIQUE | Duplicates |
| Use a formula | Wizard::EXPRESSION or Wizard::FORMULA | Expression |
There is currently no Wizard for Data Bars, even though this Conditional Type is supported by the Xlsx Reader and Writer.
We instantiate the Wizard Factory, passing in the cell range where we want to apply Conditional Formatting rules; and can then call the newRule() method, passing in the type of Conditional Rule that we want to create in order to return the appropriate Wizard:
$wizardFactory = new \PhpOffice\PhpSpreadsheet\Style\ConditionalFormatting\Wizard('C3:E5');
$wizard = $wizardFactory->newRule(\PhpOffice\PhpSpreadsheet\Style\ConditionalFormatting\Wizard::CELL_VALUE);
You can, of course, instantiate the Wizard that you want directly, rather than using the factory; but still remember to pass in the cell range.
$wizard = new \PhpOffice\PhpSpreadsheet\Style\ConditionalFormatting\Wizard\CellValue('C3:E5');
That Wizard then provides methods allowing us to define the rule, setting the operator and the values that we want to compare for that rule. Note that not all rules require values, or even operators, but the individual Wizards provide whatever is necessary; and this document lists all options available for every Wizard.
Once we have used the Wizard to define the conditions and values that we want; and have defined a style using the setStyle() method, then we call the Wizard's getConditional() method to return a Conditional object that can be added to the array of Conditional Styles that we pass to setConditionalStyles().
CellValue Wizard
For the CellValue Wizard, we always need to provide an operator and a value; and for the "between" and "notBetween" operators, we need to provide two values to specify a range.
| Condition Type | Wizard Factory newRule() Type Constant | Conditional Operator Type | Wizard Methods | Notes |
|---|---|---|---|---|
| Conditional::CONDITION_CELLIS | Wizard::CELL_VALUE | Conditional::OPERATOR_EQUAL | equals() | |
| Conditional::OPERATOR_NOTEQUAL | notEquals() | |||
| Conditional::OPERATOR_GREATERTHAN | greaterThan() | |||
| Conditional::OPERATOR_GREATERTHANOREQUAL | greaterThanOrEqual() | |||
| Conditional::OPERATOR_LESSTHAN | lessThan() | |||
| Conditional::OPERATOR_LESSTHANOREQUAL | lessThanOrEqual() | |||
| Conditional::OPERATOR_BETWEEN | between() | |||
| Conditional::OPERATOR_NOTBETWEEN | notBetween() | |||
| and() | Used to provide the second operand for between() and `notBetween() |
A single operator call is required for every rule (except between() and notBetween, where the Wizard also provides and()); and providing a value is mandatory for all operators.
The values that we need to provide for each operator can be numeric, boolean or string literals (even NULL); cell references; or formulae.
So to set the rule using an operator, we would make a call like:
$wizard->lessThan(10);
or when setting a between() or notBetween() rule, we can make use of the fluent interface with the and() method to set the range of values:
$wizard->between(-10)->and(10);
Providing a second value using and() is mandatory for a between() or notBetween() range.
To retrieve the Conditional, to add it to our $conditionalStyles array, we call the Wizard's getConditional() method.
$conditional = $wizard->getConditional();
$conditionalStyles = [$conditional];
or simply
$conditionalStyles[] = $wizard->getConditional();
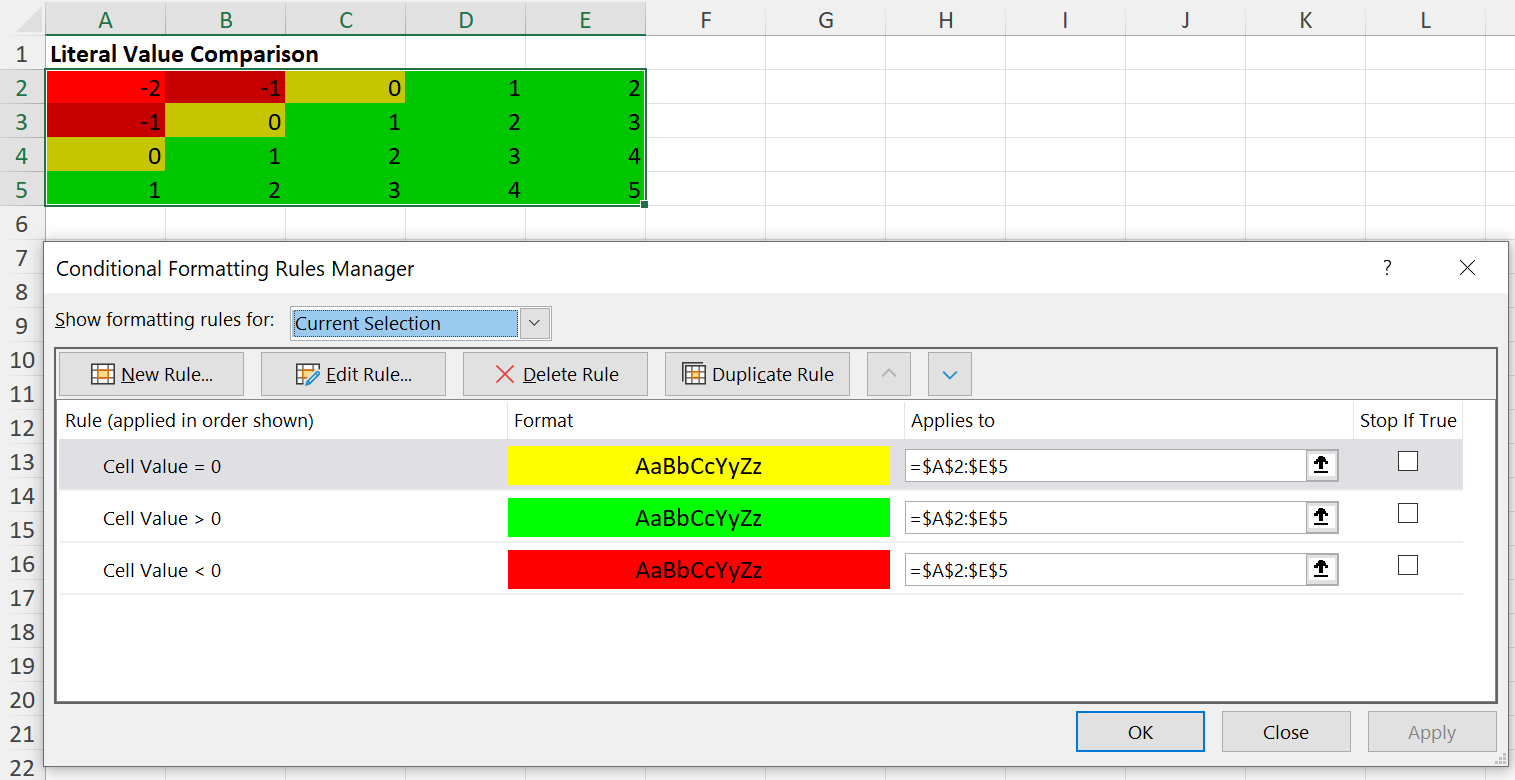
Putting it all together, we can use a block of code like (using pre-defined Style objects):
$cellRange = 'A2:E5';
$conditionalStyles = [];
$wizardFactory = new Wizard($cellRange);
/** @var Wizard\CellValue $cellWizard */
$cellWizard = $wizardFactory->newRule(Wizard::CELL_VALUE);

$cellWizard->equals(0)
    ->setStyle($yellowStyle);
$conditionalStyles[] = $cellWizard->getConditional();

$cellWizard->greaterThan(0)
    ->setStyle($greenStyle);
$conditionalStyles[] = $cellWizard->getConditional();

$cellWizard->lessThan(0)
    ->setStyle($redStyle);
$conditionalStyles[] = $cellWizard->getConditional();

$spreadsheet->getActiveSheet()
    ->getStyle($cellWizard->getCellRange())
    ->setConditionalStyles($conditionalStyles);
You can find an example that demonstrates this in the code samples for the repo.
Value Types
When we need to provide a value for an operator, that value can be numeric, boolean or string literals (even NULL); cell references; or even an Excel formulae.
Literals
If the value is a literal (even a string literal), we simply need to pass the value; the Wizard will ensure that strings are correctly quoted when we get the Conditional from the Wizard.
$wizard->equals('Hello World');
If you weren't using the Wizard, but were creating the Conditional directly, you would need to remember to wrap this value in quotes yourself ('"Hello World"')
However, a cell reference or a formula are also string data, so we need to tell the Wizard if the value that we are passing in isn't just a string literal value, but should be treated as a cell reference or as a formula.
Cell References
If we want to use the value from cell H9 in our rule; then we need to pass a value type of VALUE_TYPE_CELL to the operator, in addition to the cell reference itself.
$wizard->equals('$H$9', Wizard::VALUE_TYPE_CELL);

You can find an example that demonstrates this in the code samples for the repo.
Note that we are passing the cell as an absolute cell reference, "pinned" (with the $ symbol) for both the row and the column.
In this next example, we need to use relative cell references, so that the comparison will match the value in column A against the values in columns B and C for each row in our range (A18:A20); ie, test if the value in A18 is between the values in B18 and C18, test if the value in A19 is between the values in B19 and C19, etc.
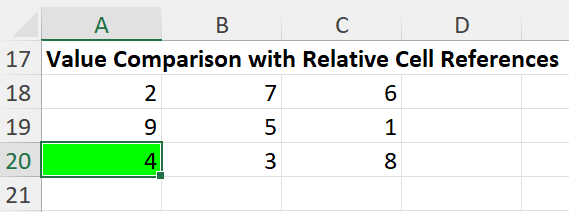
$wizard->between('$B1', Wizard::VALUE_TYPE_CELL)
    ->and('$C1', Wizard::VALUE_TYPE_CELL)
    ->setStyle($greenStyle);
This example can also be found in the code samples for the repo.
In this case, we "pin" the column for the address; but leave the row "unpinned".
Notice also that we treat the first cell in our range as cell A1: the relative row number will be adjusted automatically to match our defined range; that is, the range that we specified when we instantiated the Wizard (passed in through the Wizard Factory) when we make the call to getConditional().
Formulae
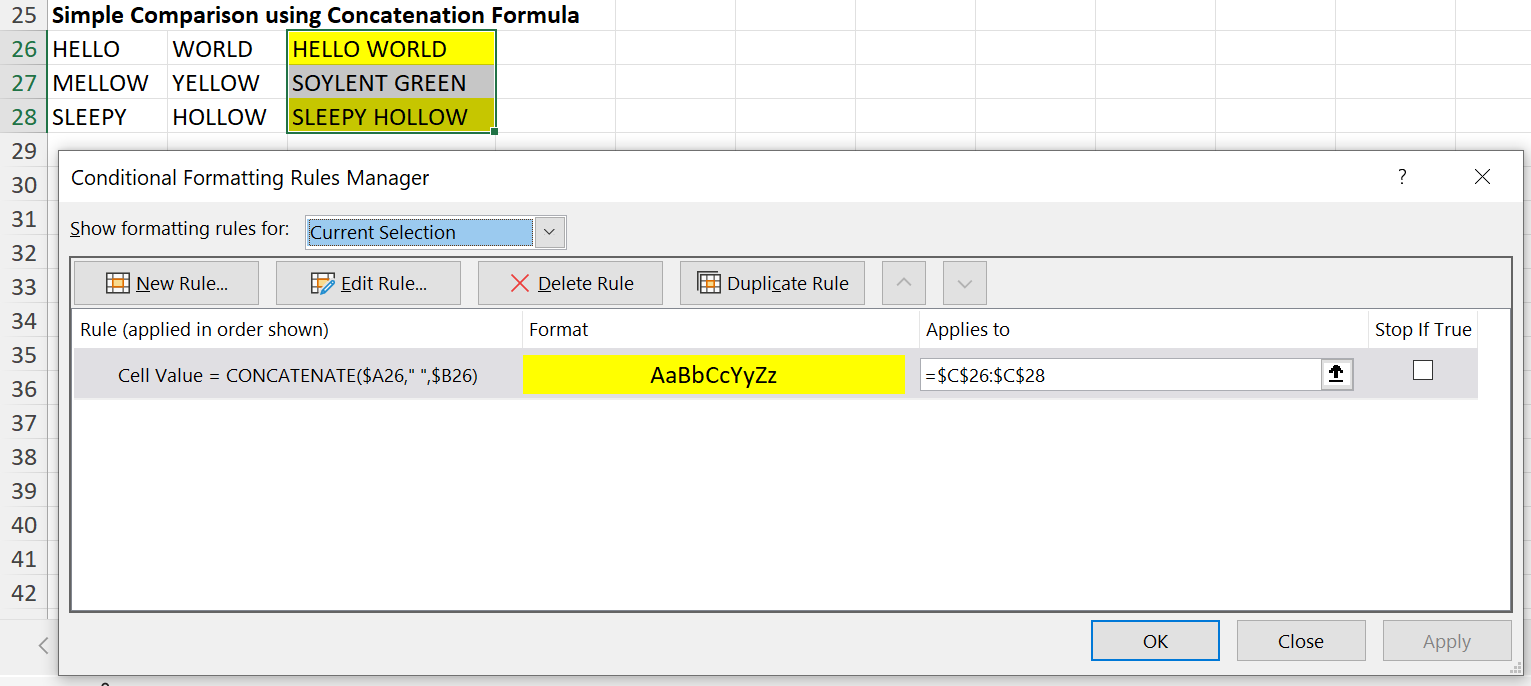
It is also possible to set the value/operand as an Excel formula expression, not simply a literal value or a cell reference. Again, we do need to specify that the value is a Formula.
$cellRange = 'C26:C28';
$conditionalStyles = [];
$wizardFactory = new Wizard($cellRange);
/** @var Wizard\CellValue $cellWizard */
$cellWizard = $wizardFactory->newRule(Wizard::CELL_VALUE);

$cellWizard->equals('CONCATENATE($A1," ",$B1)', Wizard::VALUE_TYPE_FORMULA)
    ->setStyle($yellowStyle);
$conditionalStyles[] = $cellWizard->getConditional();

$spreadsheet->getActiveSheet()
    ->getStyle($cellWizard->getCellRange())
    ->setConditionalStyles($conditionalStyles);
You can find an example that demonstrates this in the code samples for the repo.
When the formula contains cell references, we again need to be careful with pinning to absolute columns/rows; and when unpinned, we reference based on the top-left cell of the range being cell A1 when we define the formula.
Here we're defining the formula as CONCATENATE($A1," ",$B1), so we're "pinning" the column references for columns A and B; but leaving the row unpinned (explicitly set to start from row 1), which is then adjusted to the conditional range when we get the Conditional from the Wizard, and adjusted to the individual rows within that range when MS Excel displays the results.
TextValue Wizard
While we can use the CellValue Wizard to do basic string comparison rules, the TextValue Wizard provides rules for comparing parts of a string value.
For the TextValue Wizard, we always need to provide an operator and a value. As with the CellValue Wizard, values can be literals (but should always be string literals), cell references, or formula.
| Condition Type | Wizard Factory newRule() Type Constant | Conditional Operator Type | Wizard Methods | Notes |
|---|---|---|---|---|
| Conditional::CONDITION_CONTAINSTEXT | Wizard::TEXT_VALUE | Conditional::OPERATOR_CONTAINSTEXT | contains() | |
| Conditional::CONDITION_NOTCONTAINSTEXT | Wizard::TEXT_VALUE | Conditional::OPERATOR_NOTCONTAINS | doesNotContain() | |
| doesntContain() | synonym for doesNotContain() |
|||
| Conditional::CONDITION_BEGINSWITH | Wizard::TEXT_VALUE | Conditional::OPERATOR_BEGINSWITH | beginsWith() | |
| startsWith() | synonym for beginsWith() |
|||
| Conditional::CONDITION_ENDSWITH | Wizard::TEXT_VALUE | Conditional::OPERATOR_ENDSWITH | endsWith() |
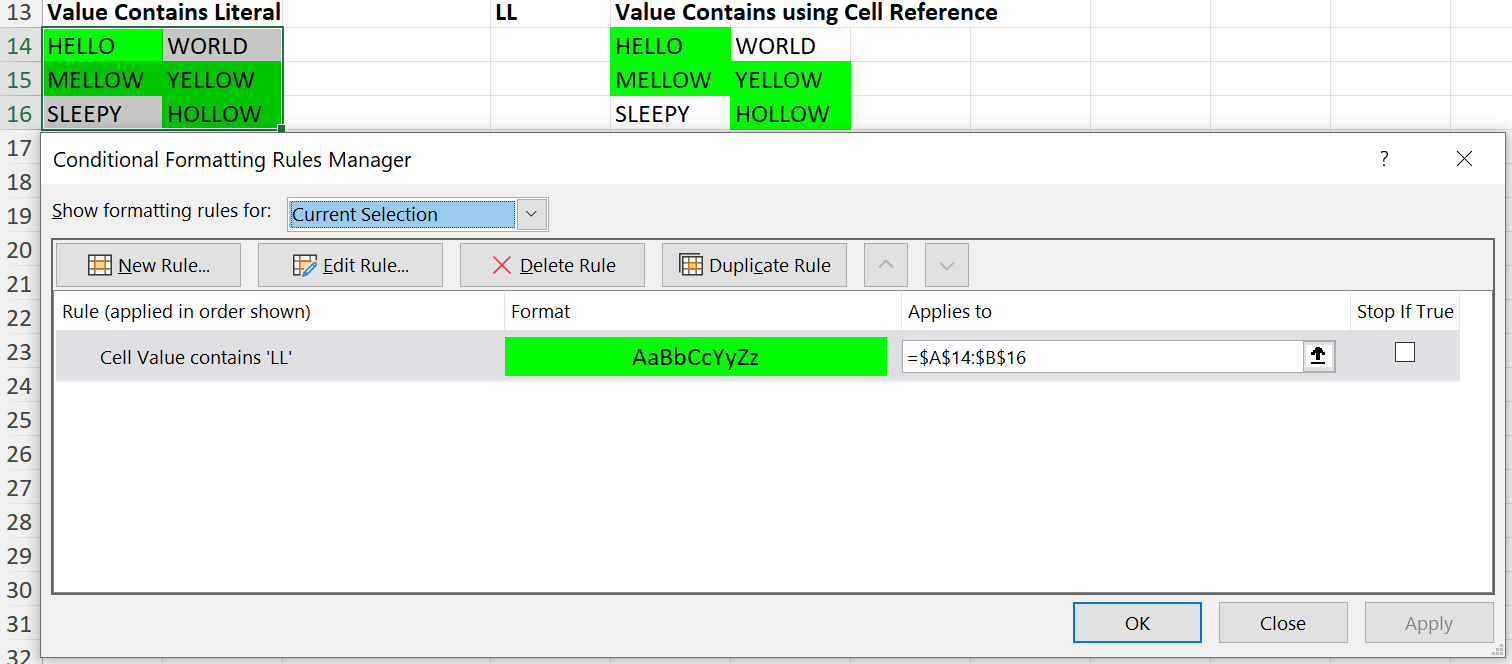
The Conditional actually uses a separate "Condition Type" for each option, each with its own "Operator Type", and the condition should be an Excel formula (not simply the string value to check), and with a custom text attribute. The Wizard should make it a lot easier to create these conditional rules.
To create a Conditional rule manually, you would need to do something like:
$cellRange = 'A14:B16';
$conditionalStyles = [];
$conditional = new Conditional();
// Remember to use the correct Condition Type
$conditional->setConditionType(Conditional::CONDITION_CONTAINSTEXT);
// Remember to use the correct Operator Type
$conditional->setOperatorType(Conditional::OPERATOR_CONTAINSTEXT);
// Remember to set the text attribute
// Remember to wrap the string literal
$conditional->setText('"LL"');
// Remember that the condition should be the first element in an array
// Remember that we need a specific formula for this Conditional
// Remember to wrap the string literal
// Remember to use the top-left cell of the range that we want to apply this rule to
$conditional->setConditions(['NOT(ISERROR(SEARCH("LL",A14)))']);
$conditional->setStyle($greenStyle);

$conditionalStyles[]

$spreadsheet->getActiveSheet()
    ->getStyle($cellRange)
    ->setConditionalStyles($conditionalStyles);
But using the Wizard, the same Conditional rule can be created by:
$cellRange = 'A14:B16';
$conditionalStyles = [];
$wizardFactory = new Wizard($cellRange);
/** @var Wizard\TextValue $textWizard */
$textWizard = $wizardFactory->newRule(Wizard::TEXT_VALUE);

$textWizard->contains('LL')
    ->setStyle($greenStyle);
$conditionalStyles[] = $textWizard->getConditional();

$spreadsheet->getActiveSheet()
    ->getStyle($textWizard->getCellRange())
    ->setConditionalStyles($conditionalStyles);
You can find an example that demonstrates this in the code samples for the repo.
There are also examples in that file for notContains(), beginsWith() and endsWith() comparisons; using literal text, and with cell references.
The actual Excel Expressions used (and that you would need to set manually if you were defining the Conditional yourself rather than using the Wizard) are listed below:
| Conditional Type | Condition Expression |
|---|---|
| Conditional::CONDITION_CONTAINSTEXT | NOT(ISERROR(SEARCH(<value>,<cell address>))) |
| Conditional::CONDITION_NOTCONTAINSTEXT | ISERROR(SEARCH(<value>,<cell address>))</ |
| Conditional::CONDITION_BEGINSWITH | LEFT(<cell address>,LEN(<value>))=<value> |
| Conditional::CONDITION_ENDSWITH | RIGHT(<cell address>,LEN(<value>))=<value> |
The <cell address> always references the top-left cell in the range of cells for this Conditional Formatting Rule.
The <value> should be wrapped in double quotes (") for string literals; but unquoted if it is a value stored in a cell reference, or a formula.
The TextValue Wizard handles defining these expressions for you.
As with the operand for the CellValue Wizard, you can specify the value passed to contains(), doesNotContain(), beginsWith() and endsWith() as a cell reference, or as a formula; and if you do so, then you need to pass a second argument to those methods specifying Wizard::VALUE_TYPE_CELL or Wizard::VALUE_TYPE_FORMULA.
The same rules also apply to "pinning" cell references as described above for the CellValue Wizard.
$textWizard->beginsWith('$D$1', Wizard::VALUE_TYPE_CELL)
    ->setStyle($yellowStyle);
DateValue Wizard
For the DateValue Wizard, we always need to provide an operator; but no value is required.
| Condition Type | Wizard Factory newRule() Type Constant | Conditional Operator Type | Wizard Methods | Notes |
|---|---|---|---|---|
| Conditional::CONDITION_TIMEPERIOD | Wizard::DATES_OCCURRING | Conditional::TIMEPERIOD_TODAY | today() | |
| Conditional::TIMEPERIOD_YESTERDAY | yesterday() | |||
| Conditional::TIMEPERIOD_TOMORROW | tomorrow() | |||
| Conditional::TIMEPERIOD_LAST_7_DAYS | last7Days() | |||
| lastSevenDays() | synonym for last7Days() |
|||
| Conditional::TIMEPERIOD_LAST_WEEK | lastWeek() | |||
| Conditional::TIMEPERIOD_THIS_WEEK | thisWeek() | |||
| Conditional::TIMEPERIOD_NEXT_WEEK | nextWeek() | |||
| Conditional::TIMEPERIOD_LAST_MONTH | lastMonth() | |||
| Conditional::TIMEPERIOD_THIS_MONTH | thisMonth() | |||
| Conditional::TIMEPERIOD_NEXT_MONTH | nextMonth() |
The Conditional has no actual "Operator Type", and the condition/value should be an Excel formula, and with a custom timePeriod attribute. The Wizard should make it a lot easier to create these condition rules.
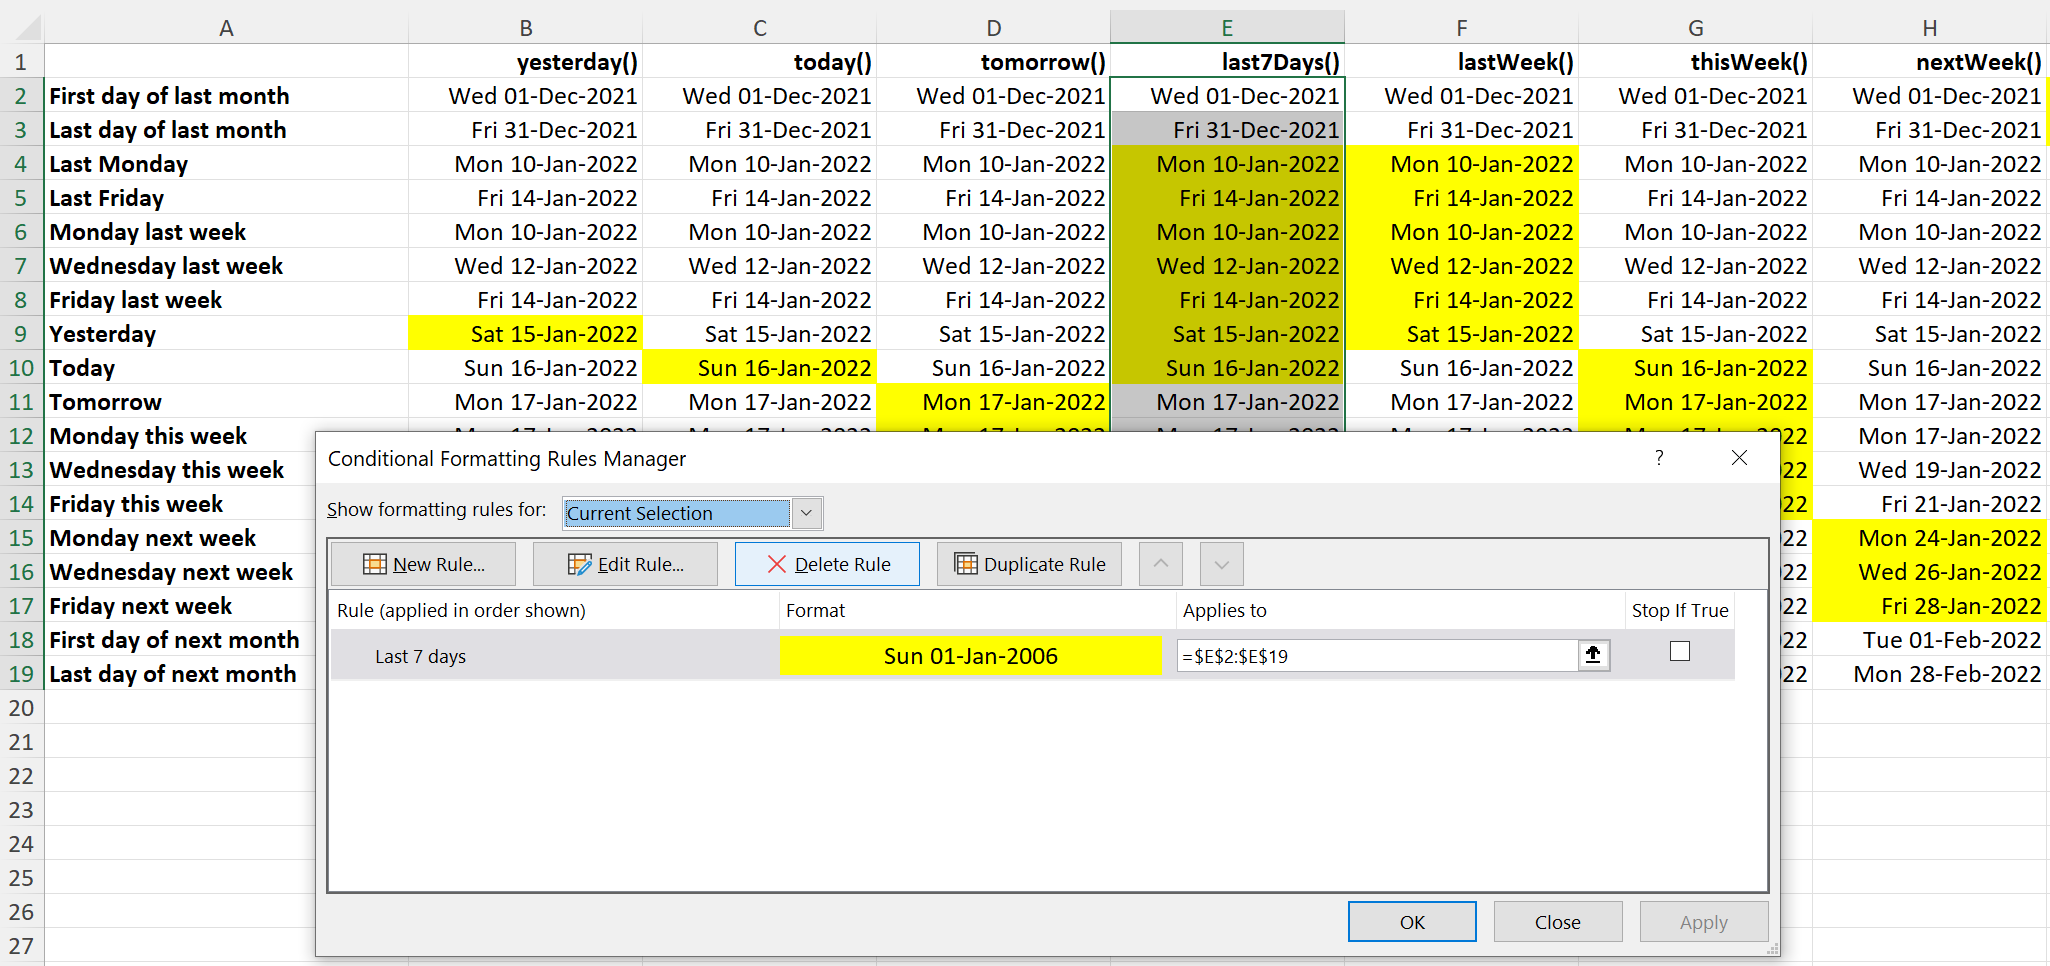
The above image shows a grid that demonstrate each of the possible Date Occurring rules, and was generated using the code samples
Typical sample code wod look something like:
$wizardFactory = new Wizard("E2:E19");
/** @var Wizard\DateValue $dateWizard */
$dateWizard = $wizardFactory->newRule(Wizard::DATES_OCCURRING);
$conditionalStyles = [];

$dateWizard->last7Days()
    ->setStyle($yellowStyle);

$conditionalStyles[] = $dateWizard->getConditional();

$spreadsheet->getActiveSheet()
    ->getStyle($dateWizard->getCellRange())
    ->setConditionalStyles($conditionalStyles);
The actual Excel Expressions used (and that you would need to set manually if you were defining the Conditional yourself rather than using the Wizard) are listed below:
| timePeriod Attribute | Condition Expression |
|---|---|
| today | FLOOR(<cell address>,1)=TODAY()-1 |
| yesterday | FLOOR(<cell address>,1)=TODAY() |
| tomorrow | FLOOR(<cell address>,1)=TODAY()+1 |
| last7Days | AND(TODAY()-FLOOR(<cell address>,1)<=6,FLOOR(<cell address>,1)<=TODAY()) |
| lastWeek | AND(TODAY()-ROUNDDOWN(<cell address>,0)>=(WEEKDAY(TODAY())),TODAY()-ROUNDDOWN(<cell address>,0)<(WEEKDAY(TODAY())+7)) |
| thisWeek | AND(TODAY()-ROUNDDOWN(<cell address>,0)<=WEEKDAY(TODAY())-1,ROUNDDOWN(<cell address>,0)-TODAY()<=7-WEEKDAY(TODAY())) |
| nextWeek | AND(ROUNDDOWN(<cell address>,0)-TODAY()>(7-WEEKDAY(TODAY())),ROUNDDOWN(<cell address>,0)-TODAY()<(15-WEEKDAY(TODAY()))) |
| lastMonth | AND(MONTH(<cell address>)=MONTH(EDATE(TODAY(),0-1)),YEAR(<cell address>)=YEAR(EDATE(TODAY(),0-1))) |
| thisMonth | AND(MONTH(<cell address>)=MONTH(TODAY()),YEAR(<cell address>)=YEAR(TODAY())) |
| nextMonth | AND(MONTH(<cell address>)=MONTH(EDATE(TODAY(),0+1)),YEAR(<cell address>)=YEAR(EDATE(TODAY(),0+1))) |
The <cell address> always references the top-left cell in the range of cells for this Conditional Formatting Rule.
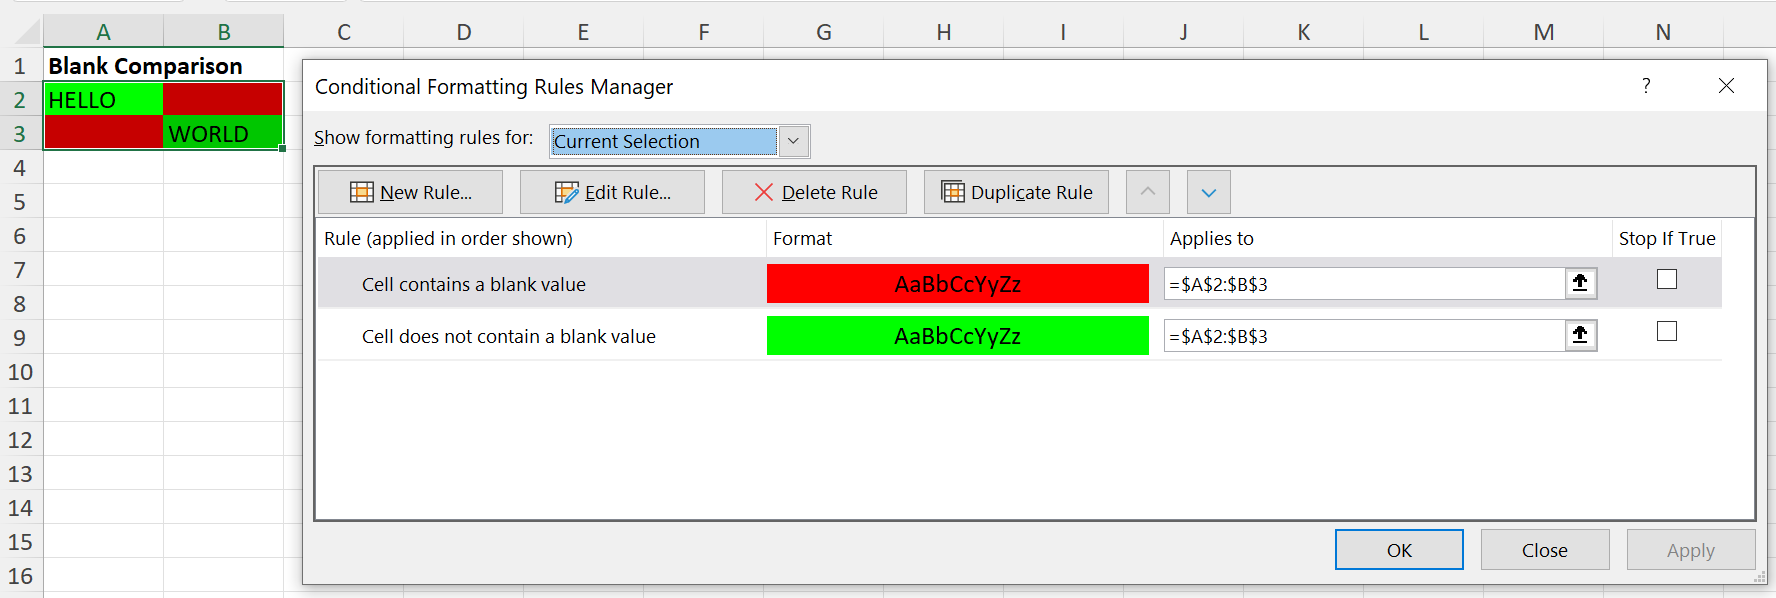
Blanks Wizard
This Wizard is used to define a simple boolean state rule, to determine whether a cell is blank or not blank.
Whether created using the Wizard Factory with a rule type of Wizard::BLANKS or Wizard::NOT_BLANKS, the same Blanks Wizard is returned.
The only difference is that in the one case the rule state is pre-set for CONDITION_CONTAINSBLANKS, in the other it is pre-set for CONDITION_NOTCONTAINSBLANKS.
However, you can switch between the two rules using the isBlank() and notBlank() methods; and it is only at the point when you call getConditional() that a Conditional will be returned based on the current state of the Wizard.
| Condition Type | Wizard Factory newRule() Type Constant | Conditional Operator Type | Wizard Methods | Notes |
|---|---|---|---|---|
| Conditional::CONDITION_CONTAINSBLANKS | Wizard::BLANKS | - | isBlank() | Default state |
| notBlank() | ||||
| isEmpty() | Synonym for isBlank() |
|||
| notEmpty() | Synonym for notBlank() |
|||
| Conditional::CONDITION_NOTCONTAINSBLANKS | Wizard::NOT_BLANKS | - | notBlank() | Default state |
| isBlank() | ||||
| isEmpty() | Synonym for isBlank() |
|||
| notEmpty() | Synonym for notBlank() |
The following code shows the same Blanks Wizard being used to create both Blank and Non-Blank Conditionals, using a pre-defined $redStyle Style object for Blanks, and a pre-defined $greenStyle Style object for Non-Blanks.
$cellRange = 'A2:B3';
$conditionalStyles = [];
$wizardFactory = new Wizard($cellRange);
/** @var Wizard\Blanks $blanksWizard */
$blanksWizard = $wizardFactory->newRule(Wizard::BLANKS);

$blanksWizard->setStyle($redStyle);
$conditionalStyles[] = $blanksWizard->getConditional();

$blanksWizard->notBlank()
    ->setStyle($greenStyle);
$conditionalStyles[] = $blanksWizard->getConditional();

$spreadsheet->getActiveSheet()
    ->getStyle($blanksWizard->getCellRange())
    ->setConditionalStyles($conditionalStyles);
This example can also be found in the code samples for the repo.
No operand/value is required for the Blanks Wizard methods; but the Conditional that is returned contains a defined expression with an Excel formula:
| Blanks Type | Condition Expression |
|---|---|
| isBlank() | LEN(TRIM(<cell address>))=0 |
| notBlank() | LEN(TRIM(<cell address>))>0 |
The <cell address> always references the top-left cell in the range of cells for this Conditional Formatting Rule.
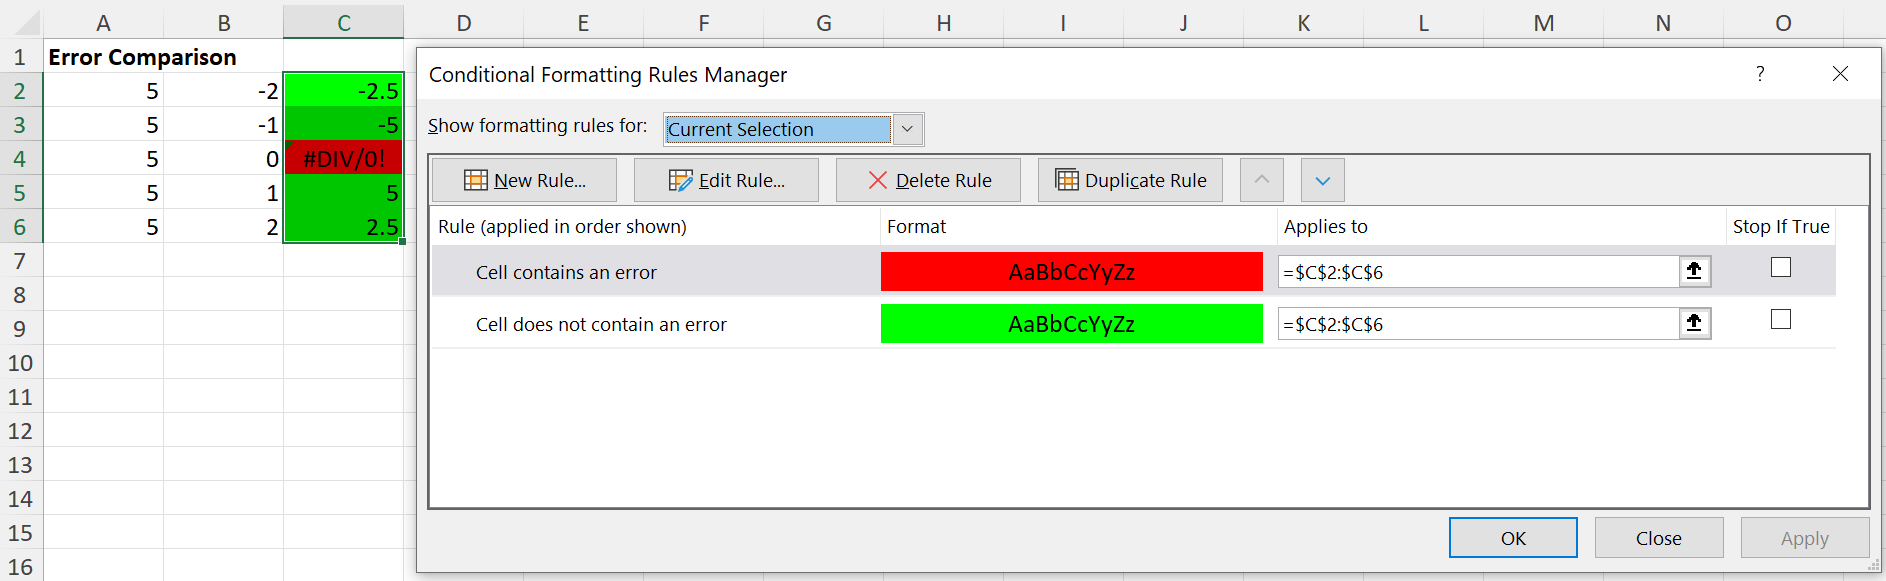
Errors Wizard
Like the Blanks Wizard, this Wizard is used to define a simple boolean state rule, to determine whether a cell with a formula value results in an error or not.
Whether created using the Wizard Factory with a rule type of Wizard::ERRORS or Wizard::NOT_ERRORS, the same Errors Wizard is returned.
The only difference is that in the one case the rule state is pre-set for CONDITION_CONTAINSERRORS, in the other it is pre-set for CONDITION_NOTCONTAINSERRORS.
However, you can switch between the two rules using the isError() and notError() methods; and it is only at the point when you call getConditional() that a Conditional will be returned based on the current state of the Wizard.
| Condition Type | Wizard Factory newRule() Type Constant | Conditional Operator Type | Wizard Methods | Notes |
|---|---|---|---|---|
| Conditional::CONDITION_CONTAINSERRORS | Wizard::ERRORS | - | isError() | Default state |
| notError() | ||||
| Conditional::CONDITION_NOTCONTAINSERRORS | Wizard::NOT_ERRORS | - | notError() | Default state |
| isError() |
The following code shows the same Errors Wizard being used to create both Error and Non-Error Conditionals, using a pre-defined $redStyle Style object for Errors, and a pre-defined $greenStyle Style object for Non-Errors.
$cellRange = 'C2:C6';
$conditionalStyles = [];
$wizardFactory = new Wizard($cellRange);
/** @var Wizard\Errors $errorsWizard */
$errorsWizard = $wizardFactory->newRule(Wizard::ERRORS);

$errorsWizard->setStyle($redStyle);
$conditionalStyles[] = $errorsWizard->getConditional();

$errorsWizard->notError()
    ->setStyle($greenStyle);
$conditionalStyles[] = $errorsWizard->getConditional();

$spreadsheet->getActiveSheet()
    ->getStyle($errorsWizard->getCellRange())
    ->setConditionalStyles($conditionalStyles);
This example can also be found in the code samples for the repo.
No operand/value is required for the Errors Wizard methods; but the Conditional that is returned contains a defined expression with an Excel formula:
| Blanks Type | Condition Expression |
|---|---|
| isError() | ISERROR(<cell address>) |
| notError() | NOT(ISERROR(<cell address>)) |
The <cell address> always references the top-left cell in the range of cells for this Conditional Formatting Rule.
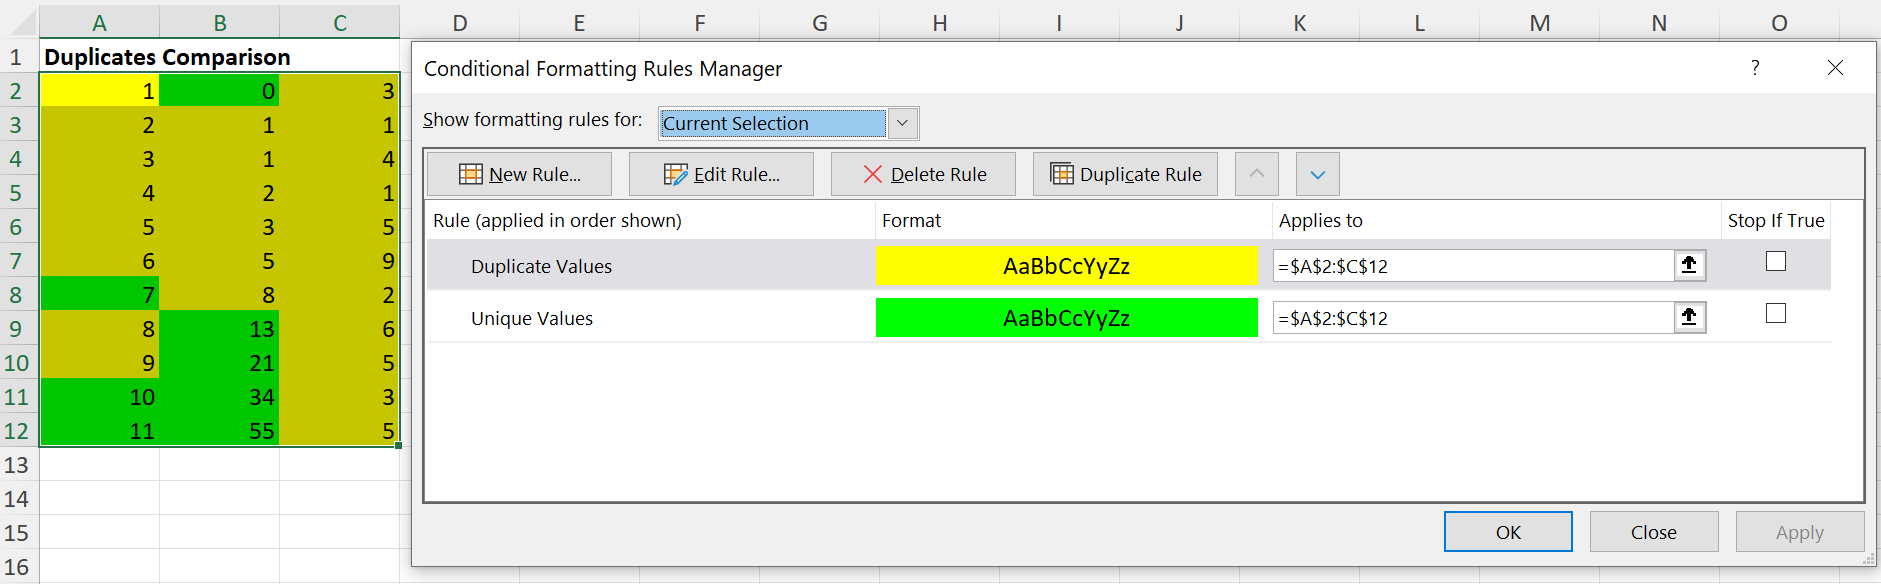
Duplicates/Unique Wizard
This Wizard is used to define a simple boolean state rule, to determine whether a cell value matches any other cells with the same value within the conditional cell range, or if the value is unique in that range of cells.
It only has any meaning if it is applied to a range of cells, not to an individual cell.
Whether created using the Wizard Factory with a rule type of Wizard::DUPLICATES or Wizard::UNIQUE, the same Duplicates Wizard is returned.
The only difference is that in the one case the rule state is pre-set for CONDITION_DUPLICATES, in the other it is pre-set for CONDITION_UNIQUE.
However, you can switch between the two rules using the duplicates() and unique() methods; and it is only at the point when you call getConditional() that a Conditional will be returned based on the current state of the Wizard.
| Condition Type | Wizard Factory newRule() Type Constant | Conditional Operator Type | Wizard Methods | Notes |
|---|---|---|---|---|
| Conditional::CONDITION_DUPLICATES | Wizard::DUPLICATES | - | duplicates() | Default state |
| unique() | ||||
| Conditional::CONDITION_UNIQUE | Wizard::UNIQUE | - | unique() | Default state |
| duplicates() |
The following code shows the same Duplicates Wizard being used to create both Blank and Non-Blank Conditionals, using a pre-defined $redStyle Style object for Blanks, and a pre-defined $greenStyle Style object for Non-Blanks.
$cellRange = 'A2:E6';
$conditionalStyles = [];
$wizardFactory = new Wizard($cellRange);
/** @var Wizard\Duplicats $duplicatesWizard */
$duplicatesWizard = $wizardFactory->newRule(Wizard::DUPLICATES);

$duplicatesWizard->setStyle($redStyle);
$conditionalStyles[] = $duplicatesWizard->getConditional();

$duplicatesWizard->unique()
    ->setStyle($greenStyle);
$conditionalStyles[] = $duplicatesWizard->getConditional();

$spreadsheet->getActiveSheet()
    ->getStyle($duplicatesWizard->getCellRange())
    ->setConditionalStyles($conditionalStyles);
This example can also be found in the code samples for the repo.
Duplicates/Uniques Conditions are only identified by a Condition Type in Excel, with no operator and no expression.
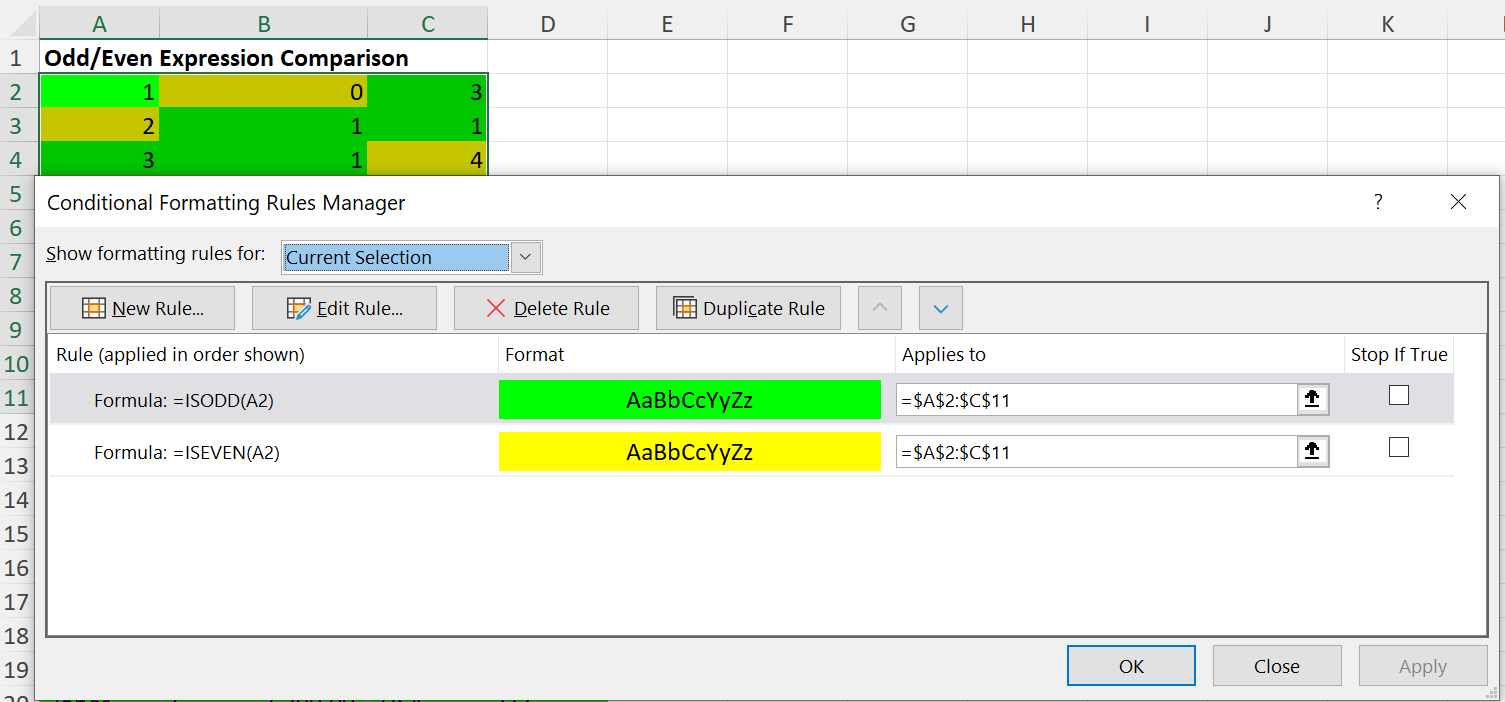
Expression Wizard
The Expression Wizard expects to be provided with an Expression, an MS Excel formula that evaluates to either false or true.
| Condition Type | Wizard Factory newRule() Type Constant | Conditional Operator Type | Wizard Methods | Notes |
|---|---|---|---|---|
| Conditional::CONDITION_EXPRESSION | Wizard::EXPRESSION or Wizard::FORMULA | - | expression() | The argument is an Excel formula that evaluates to true or false |
| formula() |
Just as a simple example, here's a code snippet demonstrating expressions to determine if a cell contains an odd or an even number value:
$cellRange = 'A2:C11';
$conditionalStyles = [];
$wizardFactory = new Wizard($cellRange);
/** @var Wizard\Expression $expressionWizard */
$expressionWizard = $wizardFactory->newRule(Wizard::EXPRESSION);

$expressionWizard->expression('ISODD(A1)')
    ->setStyle($greenStyle);
$conditionalStyles[] = $expressionWizard->getConditional();

$expressionWizard->expression('ISEVEN(A1)')
    ->setStyle($yellowStyle);
$conditionalStyles[] = $expressionWizard->getConditional();

$spreadsheet->getActiveSheet()
    ->getStyle($expressionWizard->getCellRange())
    ->setConditionalStyles($conditionalStyles);
This example can also be found in the code samples for the repo.
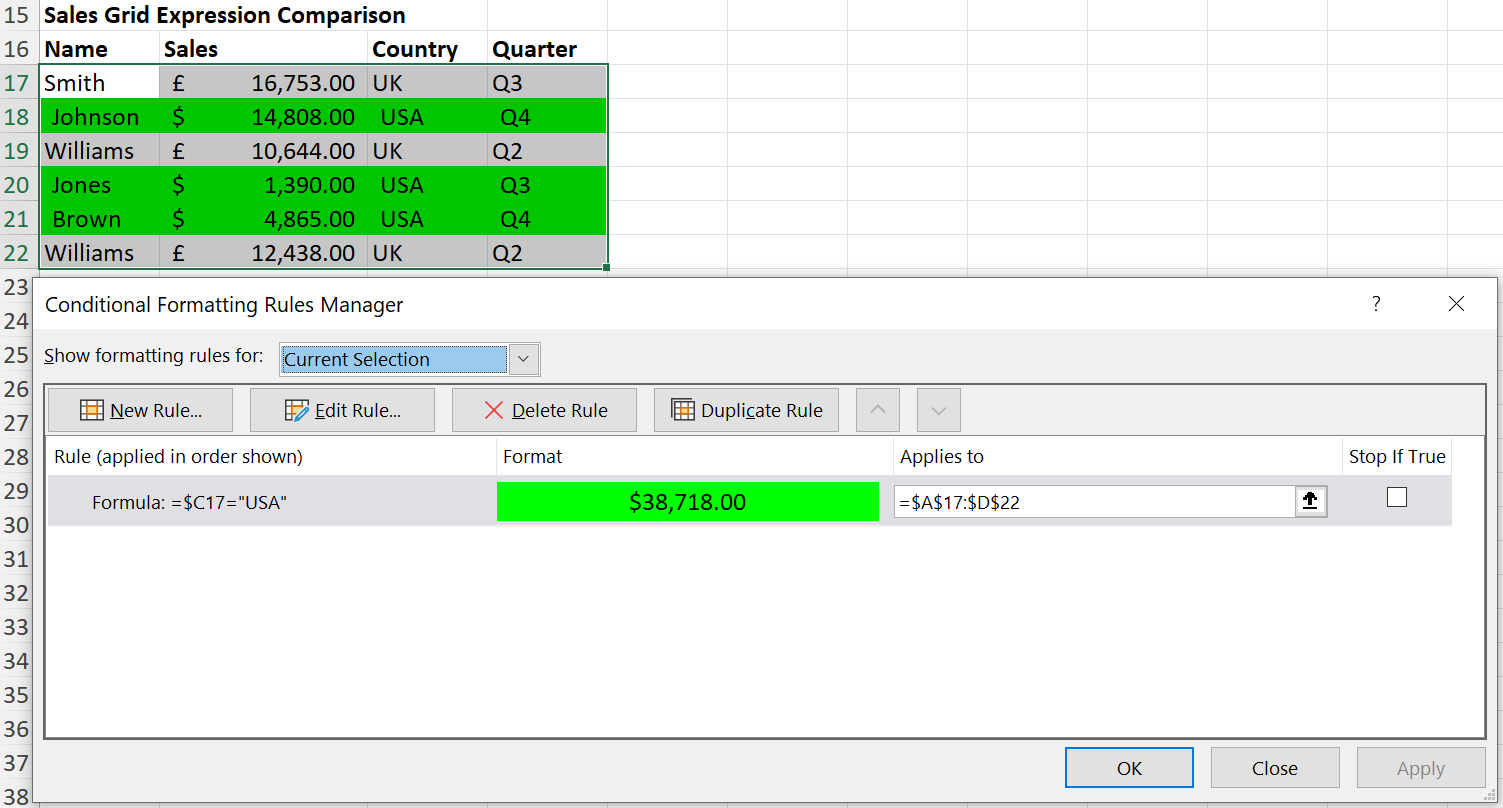
As a more complicated example, let's look at a Sales Grid, and use conditional formatting to highlight sales in the "USA" region:
$greenStyleMoney = clone $greenStyle;
$greenStyleMoney->getNumberFormat()->setFormatCode(NumberFormat::FORMAT_ACCOUNTING_USD);

$cellRange = 'A17:D22';
$conditionalStyles = [];
$wizardFactory = new Wizard($cellRange);
/** @var Wizard\Expression $expressionWizard */
$expressionWizard = $wizardFactory->newRule(Wizard::EXPRESSION);

$expressionWizard->expression('$C1="USA"')
    ->setStyle($greenStyleMoney);
$conditionalStyles[] = $expressionWizard->getConditional();

$spreadsheet->getActiveSheet()
    ->getStyle($expressionWizard->getCellRange())
    ->setConditionalStyles($conditionalStyles);
This example can also be found in the code samples for the repo.
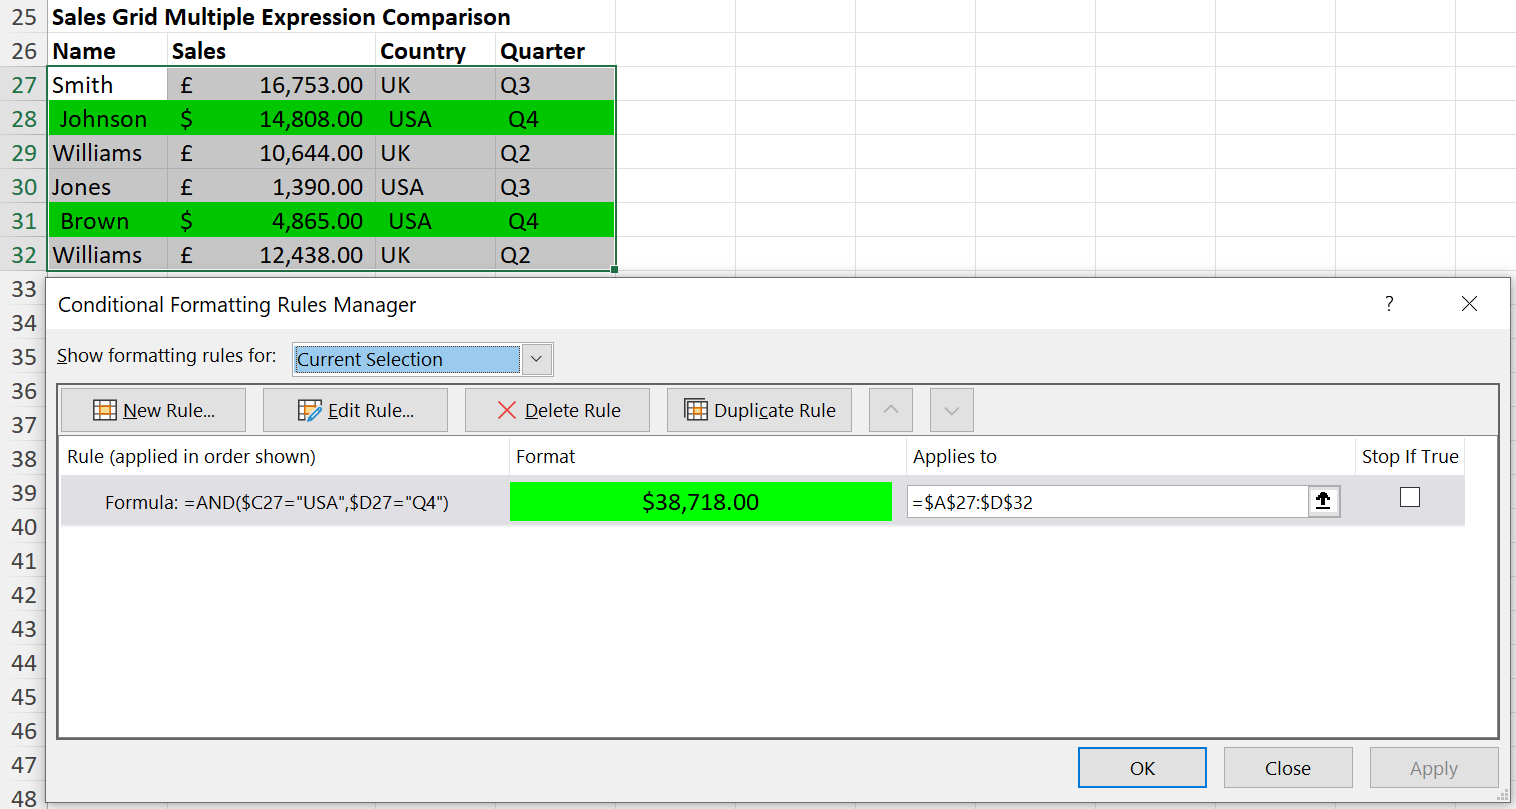
Or we could apply multiple comparisons in the same expression, so to check for all sales for the "USA" region in "Q4", combining them using an Excel AND():
$expressionWizard->expression('AND($C1="USA",$D1="Q4")')
    ->setStyle($greenStyleMoney);
This example can also be found in the code samples for the repo.
General Notes
Stop If True, and No Format Set
Normally, Excel continues to check even after it finds a match. To tell it to stop once a match is found, 'stop if true' should be specified:
$conditional->setStopIfTrue(true);
Sometimes you want a matched cell to just show its unconditional format. This is most useful in conjunction with 'stop if true'.
$conditional->setNoFormatSet(true);
Changing the Cell Range
If you want to apply the same Conditional Rule/Style to several different areas on your spreadsheet, then you can do this using the setCellRange() method between calls to getConditional().
$wizardFactory = new Wizard();
/** @var Wizard\CellValue $wizard */
$wizard = $wizardFactory->newRule(Wizard::CELL_VALUE);

// Apply the wizard conditional to cell range A2:A10
$cellRange = 'A2:A10';
$conditionalStyles = [];
$wizard->between('$B1', Wizard::VALUE_TYPE_CELL)
    ->and('$C1', Wizard::VALUE_TYPE_CELL)
    ->setStyle($greenStyle);

$spreadsheet->getActiveSheet()
    ->getStyle($wizard->getCellRange())
    ->setConditionalStyles($conditionalStyles);

// Apply the same wizard conditional to cell range E2:E10
$cellRange = 'E2:E10';
$wizard->setCellRange($cellRange);
$conditionalStyles = [];
$wizard->between('$B1', Wizard::VALUE_TYPE_CELL)
    ->and('$C1', Wizard::VALUE_TYPE_CELL)
    ->setStyle($greenStyle);

$spreadsheet->getActiveSheet()
    ->getStyle($wizard->getCellRange())
    ->setConditionalStyles($conditionalStyles);
Because we use cell A1 as the baseline cell for relative references, the Wizard is able to handle the necessary adjustments for cell references and formulae to match the range of cells that it is being applied to when getConditional() is called, so it returns the correct expression.
Converting a Conditional to a Wizard
If you already have a Conditional object; you can create a Wizard from that Conditional to manipulate it using all the benefits of the Wizard before using that to create a new version of the Conditional:
$wizard = Wizard\CellValue::fromConditional($conditional, '$A$3:$E$8');
$wizard->greaterThan(12.5);

$newConditional = $wizard->getConditional();
This is ok if you know what type of Conditional you want to convert; but it will throw an Exception if the Conditional is not of an appropriate type (ie. not a cellIs).
If you don't know what type of Conditional it is, then it's better to use the Wizard Factory fromConditional() method instead; and then test what type of Wizard object is returned:
$wizard = Wizard::fromConditional($conditional, '$A$3:$E$8');
if ($wizard instanceof Wizard\CellValue) {
    $wizard->greaterThan(12.5);

    $newConditional = $wizard->getConditional();
}